Home » 2018
Yearly Archives: 2018
Don’t Forget the Database

As a tech trainer who teaches a number of coding workshops, I encounter numerous K-12 teachers who are enthusiastic AND successful at teaching coding to their students. Some are using the “Drag-and-Drop” “Scratch-style” environments others are using real coding with languages like Python, Java or C# to name a few. And this is cool… really cool. However, something that never, or rarely, comes up at the coding teacher meet-and-greets are Databases.
I can understand this. Who wants to ruin the party with digitally stored data that we, as humans get to see in the forms of tables that are linked together by common fields. No spaceships, no bad guys, and when you’re done with your project, you don’t get to package your game and share it with your classmate so that he or she can joyously shoot stuff while at the same time being completely in awe of your computer skills.
Databases are as Unsexy as You Can Get
Teaching databases to a group of students who are eager to code even the simplest game goes over like a veggie stir-fry concession stand at a monster truck rally. Until your students start asking you questions like This:
-
“How do I permanently log players scores so that I can track the player with the highest score?”
-
“How can I make a game open with specific user settings?”
-
“How can I make my program keep track of where I left off?”
-
“How can I make a very large game run more smoothly and use the least amount of data?”
-
“How does my system know when my username and password are correct when I log in.”
While all of these are rather complex to execute at basic levels or tie into existing projects, these questions can serve as teachable moments to introduce the concept of the database. Now … that veggie stir-fry is looking pretty good.
Any data that is stored permanently outside of an application is stored in a database-like file, even if it is a comma separated text file. It is important for students who want to pursue careers in tech to understand this. Plus databases in today’s world are what the aqueducts were to the Romans, the backbone of the civilization. Well maybe it was the roads or perhaps the wine but the Romans had some kind of backbone to their civilization and it was the equivalent of a Database.
Today we hardly do anything that is not using a database. From logging into a website to checking our email to skimming Facebook or Twitter to reading this blog… (oh yes…. this content is being retrieved from a MySQL database)… to playing our Spotify playlists to checking our bank accounts to logging into Google Classroom and the list goes on.
So you want to do this for a living?
Being a game programmer is the dream of so many young people, perhaps the modern-day equal of what wanting to be the next Eddie Van Halen was in the 80s. The job market for programmers only offers a percentage of those jobs. Just for fun… well, I thought it was fun… I Googled … (whoever thought that would be a verb?) … “Computer programmer jobs NJ”, of course, I was able to see a solid listing of want-ads.
After viewing the first 10 job descriptions I saw that nine of them included SQL(database query language) as a required skill. The only one that did not was for an internship and I guarantee some kind of database query language would come up in the interview. PLUS query language will be a requirement for any gaming gig. AND if that’s not enough, if a student ever ends up working for a company whose product is a web-based application (and that’s a very good chance), they will need to know databases as well. All interactive web apps are backed by databases.
So the moral of the story is:
Learning databases and query language to be a gaming programmer is the equivalent of practicing your scales if you want to be a rockstar. It might not be fun (although I think it is) but it will get you the gig.
My advice, (which isn’t really that valuable) is:
You can’t go wrong teaching SQL. It is a universal query language that is easy to learn and can be applied to thousands of places. Plus, the concepts you learn from practicing it can be transferred to other similar languages. While the ultimate goal would be a server you can access with SQL Server or mySQL installed, you may be more interested in some of the sites below that include free tutorials and interactive practice apps. Plus there are a number of simulators that can be downloaded to desktop machines in developer mode, but those are sometimes complicated to install and activate.
Not sure what databases and SQL are? Here are a couple of links to explain.
-
How to Describe Databases to Kids
-
What is SQL (a little complicated but it’s the best I can do)
Here are some places to get started if you would like to add Databases and SQL to your curriculum.
-
A quick and easy and interactive introduction to SQL
-
W3Schools.com Great SQL Tutorial
-
A full-fledged SQL course (probably better for you than your students)
-
Learn SQL from Code Academy
Google Keep your Classroom
Keep your Classroom:
Classroom Uses for Google Keep

What is google Keep?
This is simple, Google Keep is a note taking app that is available for IOS and Android that fully integrates with Google Applications. It is also enhanced to allow note taking to include:
- Text
- Check lists
- Audio
- Voice to Text
- Images
- Drawings
- Web Links
- OCR that’s optical character recognition – Yes! You can take a photo of typewritten text and convert it to word processed text.
Organization
Once you take a note you can add labels, color code your notes, set reminders AND …. get this…. You can set your reminders based on location. What? This means that if you need to do something when you arrive at your school in the morning, you can tell it to alert you as soon as your phone senses that you have reached that spot. All notes are searchable via keywords and this includes any image that contains text in it.
So let’s start by looking at basic operation. I am going to show this from the Chrome Browser perspective but, this translates easily to the phone app.
So now I know how to use it, but how can I apply it to my classroom?
Keep can be applied a number of ways. At the end of this post, I have included some links that are loaded with ideas that various teachers have implemented. I will share a few favorites right now.
Data collection / Research
This is the obvious one. Students can gather research information into Keep on their phones (the devices they stare at all day), label their notes to group them together and then access the links from a Google doc to compile the research. Information can be saved from any device and then brought together in the doc… or maybe a slideshow.
Take a look
Creative Writing / Thought organization
Using the same techniques above, students can create notes based on their creative ideas to include in a short… or not so short … story and organize them into a specific order to complete their literary masterpiece.
Storyboard your Video Projects
Keep can be use nicely with Docs or Slides to create a storyboard for a video project. Simply jot your storyboard concepts down on individual notes then… drag and drop them to a table in docs. This is a great time to use the drawing feature.
Store your grading comments
Do you find yourself writing the same comments over and over again while grading papers in Google docs? Google classroom has created a tool for this but, if you are not using classroom, create a Keep note with all of your most used comments on it. Open your Keep from the right panel and just copy and paste the comments into the comment boxes in Docs. this is handy because Keep is always accessible from docs.
An assistive device for reading
Now that the Chrome OS includes “Select to Speak” on Chromebooks. Make sure you enable it in your Chrome settings. You can combine the OCR capabilities in Google Keep with this valuable accessibility tool. Just take a snapshot of a page from textbook or any printed material and use the “Grab Image Text” feature to convert the scanned text to word processed text…yes mad made the words “word processed into a verb… after that the student in need can open the doc on a Chromebook and use the “Select to Speak” feature to recite the document verbally.
The examples above a just a few to get you started. Here are some links for mor exploration. Feel free to add your favorite way to use keep in the classroom in the comments.
- 10 ways Google Keep can help streamline life at school
- 15 Ways Students can use Google Keep
- Google Keep: A Busy Teacher’s Best Friend
Happy Keeping
Better Efficiency Through Snoozing
How to Use Gmail’s SNOOZE Feature to Increase Productivity
Not everybody is happy with the 2018 Gmail upgrades. Some people I’ve encountered, are rather irate.
I ….. am not.

Our friends at Google have integrated a few features like a sidebar that gives us quick access to Keep, Calendars and Tasks. Additionally I love the fact that I can open an attachment without opening an email. After all. Who needs to read the obligatory “see attached” that is always in the content of an email that includes a requested document? This is only rivaled by “Oops… forgot to attach the file.” Something that can sometimes be avoided with Gmail’s undo feature.
All those things are cool, but my favorite new feature is SNOOZE. Why… because I am a procrastinator. Why do today what you can do tomorrow??? Or maybe I just prefer to prioritize my tasks by when they need to be completed.
Either way… SNOOZE rocks.
What does SNOOZE do?
It archives the selected email until you need it and then it resends it to you at your chosen date and time. Wicked!
Here’s how it works
Well it doesn’t, unless you have your gmail settings in conversation view. So to those of you that hate conversation view, this may be a reason to retry it.
How do I Set my Gmail to Conversation View?
- Go to settings
- Scroll to conversation view
- Select “Conversation View On”
- Click to save changes at the bottom of the page.
Now what?
Now that you are in conversation view it is time to try to snooze an email. Let’s look at Snoozing from the inbox view
- When you mouse-over any email in your inbox, a set of icons appear on the subject line. The one furthest to the right is the snooze button. It looks like an analog clock. We used to tell time from devices that looked like this.
- When you click the SNOOZE icon, you will get a few choices
- Later Today
- Tomorrow
- This Weekend
- Next week
- Pick a date and time
These are somewhat self explanatory so in this example we will set a date and time.
But is there more than one way to SNOOZE?
Indeed there is!
If you select an email’s checkbox in your inbox, the SNOOZE icon will appear at the top of the page.
If you open an email. You will also see the snooze icon at the top of the page.
Where do my Snoozed Files Go?
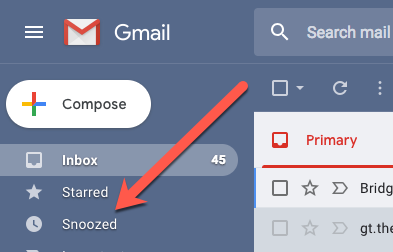 To a happy place where trolls are squashed by fairies and people don’t post pictures of their cats on Facebook. NO! They are archived to the Snooze section of Gmail. This can be found on the left sidebar where you access your labels.
How do I SNOOZE?
I use snoozing anytime I know I want to respond to an email or act on a task for an email at a later date. This can be handy for:
- Responding to something important that may take too much time to focus on at the time you receive it.
- Reminding yourself when concert tickets will go on sale.
- Bill payment reminders
- Cancelling a trial account for a web service that may start charging you automatically after a specific date.
- Following up on a project that may not need your attention for several months.
- When I want to break up with my fiancee but it’s Christmas so I snooze one of her emails till February.
- When I get a promo that something really cool that I want is on sale till Sunday but I don’t get paid till Friday.
Got any more Ideas???? I’ll bet you do! Feel free to leave them in the comments below.
And Another Thing
Prior to the inclusion of the SNOOZE feature, I was relegated to using an annoying and cumbersome Add-on that shall remain nameless to get this functionality. I no longer need that add-on.
Audio: The Ugly Stepchild of Screencasting
Ok… You’ve assessed the needs of your audience You know your content…you’ve followed your well-planned script which has been whittled down to just the necessary points in the most strategic order possible to teach your topic. You’ve even cleaned up your desktop so that nobody sees extraneous files or folders when you switch applications. What could go wrong?
 What could go wrong is what does goes wrong with a majority of the screencasts I see and (unfortunately) hear. You have neglected to put love into the audio portion of your screencast. Sound is the most overlooked attribute in screencasting and video. Bad audio makes your presentations look … well … sound, amateurish and creates an unpleasant situation for viewers.
In some cases this is not your fault or your priority. I get it. 10 teachers in your district just emailed you with the same question about using the snooze feature in Gmail and you decide to make a quick screencast and post it on Youtube so that you don’t have to answer the question an 11th time. In that case you may click away or read on so that you can improve your screencasts for more discerning situations.
Why do I care so much about audio quality?
Let’s answer this question with a few questions:
-
Why do I care about grammar and punctuation?
-
Why do I care about being prepared for a presentation?
-
Why do I care about matching socks?
The answer to all of these is:
Because not paying attention to these things lowers your coolness quotient exponentially.

Why does this happen to screencasters?
Because if you don’t pay attention to a few key points, the properties of sound and the nuances of technology will embarrass you in a way that can only be outdone by brining a drunken spouse to your next staff meeting.
So what are the mistakes that screencasters make?
Mistake 1
Choosing the wrong recording software
The first is in choosing the recording software. Many people use free, online applications that do the job but at the cost of compensating sound quality in the interest of space and bandwidth. They don’t do this to be mean. They do this because the higher the audio file encoding settings the more space and bandwidth will be required.
For some of you, these free options are your only option …. so… given the choice between not screencasting or buying a quality screencasting app you should, by all means, just use the tools that are within your budget. You should try different ones. They are not all equal and I have provided a link to some recent comparisons at the bottom of this page.
Mistake 2
Not getting close enough to your microphone.
I hear this less now because many people are using the built-in mics on their laptops (mistake 3).
Why is this a problem?
Because the further away a sound source is from a mic the more you hear the sound (and reverberations) of the room. Plus your voice won’t be nearly as loud or as clear. This gets particularly ugly when you add low bitrate encoding to the equation. The kind you get from some free, online screencasting apps. This doesn’t mean that you need to lean over and position your lips right in front of it, that will cause mic pops and distortion. (Save that posture for your after school yoga session). Six inches to a foot and a half is a nice proximity.
Mistake 3
Using your built-in computer mic.
These mics just aren’t that good. I don’t want to get into a huge discussion about frequency response, cardioid patterns and transient sensitivity but think of it like this: A quality studio mic (probably overkill for our needs here) costs more than your laptop did. Even when compared to a fully loaded Macbook Pro. I’ve used some mics that were 20,000+ dollars. So based on the fact that your computer does a lot more than just convert soundwaves into electrical energy (that’s what a mic does), it stands to reason that a few corners are being cut in that area.
Mistake 4
Picking the wrong room to record in.
Because you already know that close micing is the way to go, the sound of your room ambience is not that important (unless you are trying to recreate John Bonham’s drum parts on “When the Levee Breaks”). But what is important is that you find a quiet place. A room free from noisy vents, outside noises (although I am a sucker for a nearby siren due to my urban upbringing), and free from crowd noises. Again these factors become even more distracting when using low-fi audio files.
Let’s listen to some examples!
Example 1
First, here is a voice track recorded with lots of room noise using a built-in Chromebook mic and free online screencasting software. Mistakes 1,3 and 4.
Listen for the phasey, swirling, alien sound that is particularly apparent on the words “crowd noise.” This is the result of a combination of a low quality mic and the low bit rate encoding that is part of using free online screencasting software. As for the noise… well that needs no introduction, although it does help to emphasize the swirly sound.
Example 2
In this example you’ll hear all four mistakes. A mildly noisy room recorded into a free online app from a distance into a built-in microphone. Again…Listen to the swirling aliens that are possessing my voice,
Example 3
In this example I got closer to the mic. Notice that my voice is clearer and more intimate (don’t be scared) but the aliens are still swirling around me. Mistakes 1.3 and 4 are engaged here.
Example 4
Now I’m using the same set up but I have added a USB mic into the chain. This is a big improvement, almost bordering on acceptable. Let this be your worst case scenario. The mic has compensated for the lower bandwidth. There is a technical explanation for this I need not frighten you with. I used an Audio-technica AT2020 USB mic for this. I highly recommend this mic for its ratio of quality to pricing.
In this example you can still hear the lower bitrate artifacting but it has been minimized. What? You Can’t hear it? Well you will when you compare it to the following examples.
Example 5
Now … in the following examples I am using a Macbook Pro with Camtasia. Each example will get a little better. In this one I am using an internal mic. The biggest problem here is that it is picking up way too much room noise in spite of better fidelity on the voice.
Example 6
This one is closer to perfect. I used the AT Mic again …. big difference. Would have been great if the people in the background could have controlled themselves and been quiet. My fault for making mistake number 4.
Example 7
And finally… I would like to say that we’ve reached perfection… I would like to, but I can’t. Oh … this is the best one here, but I’m still appalled at the hum that my mic is picking up from my computer’s fan / hard-drive. This could have been avoided in 2 ways:
-
By suspending a boom overhead… I don’t see a lot of screecasters doing this… a bit overkill for this situation.
-
By trying to place the mic as far away as possible from the laptop. This is difficult if you need to “click along” with your narration to illustrate steps. This may work if you record your voice-over first then, add the screencast animation after the fact. Perhaps a subject for a future blog post.
But Phil… this is great for screencasting. What about video?

Well in making videos, mistake 2 (not getting the mic close enough to your sound source) is the most common. To remedy that, you should use a lavalier (clip on) mic when possible and when not possible, use a shotgun mic. Unless of course you plan on ding ADRs later. What’s an ADR? (you probably won’t be doing them). Here is a nice article comparing mics for video recorders.
All examples back-to-back
Now here are all of the examples back-to-back for your enjoyment and ultimately… your astonishment in experiencing the drastic differences.
And one last thing: Don’t “Go Ahead” yourself into a corner
Didn’t your third grade teacher tell you not to keep using the same word in repetition in a paragraph or essay? Ok, it was your 4th grade teacher. Regardless, check your dialog for this. Often times when we work without a script this can happen. In most tech tutorials I have noticed the the phrase ‘go ahead” is used to the point of giving me hives. I don’t want to embarrass any of my fellow screencasters by posting examples but this can be annoying.
“I’m gonna go ahead and start a new file, then I’m gonna go ahead and enter an avatar. Now I’m going to go ahead and set my background….. go ahead, go ahead go ahead PLEASE!”
It can be that bad in some videos. As a general rule. If you can remove a word from a sentence without changing that sentence’s meaning, leave it out or limit that word to no more than two uses per presentation.
So to sum things up:
Every time you eliminate one of the 4 mistakes above, your audio quality will improve. If nothing else…. Get yourself a good remote mic. When people view your screencasts they might not consciously notice the bad audio, but they will sense that it is not a quality project. Put your best foot forward when you share your valuable knowledge. When you review your next screencast, don’t just check it for visual glitches. Check your sound and give that ugly step child some love.
Below are some links to more information and resources.
The Mystery of the Missing Audio in my Video
First the Mystery
Watch this brief clip. For best results listen on speakers. The flaws are not as obvious on headphones.
What did you hear, Or not hear?
Well… not much. We saw Kim speaking but at best the audio sounded as if it was in a tunnel and at worst … you might not have heard her at all. Very sad … she was saying some deep stuff.
Can you guess what the problem was?
Did you think there was a glitch in the audio export of this clip from editor app, in this case, Final Cut Pro X?
Wrong: That cannot be the case.
Why: Because the audio does not completely drop out in the example. You can still hear the background music! Finished video files do not support multiple audio tracks. There is no way that one layer simply doesn’t get exported from the editing application and the other does (unless of course it’s muted, but that was not the case). It’s all or none for audio in a video file.
Think again.
If you guessed “phase cancellation:”
Pat yourself on the back, sit back in your chair with your hands behind your head and gloat over your impeccable knowledge of audio production. Post it on social networks, you might even add the triumphant cackle emoji. (Someone needs to make one)
If you did not … read on. This may happen to you.
So what is phase cancellation and how did it mess up Kim’s voice?
Scary, semi-technical definition: Phase cancellation occurs when two identical audio signals combine. When this happens the opposing waveforms “cancel” each other out making the resulting signal sound funny or in-audible.
Here is a brief, simplified, yet still confusing video targeted at budding audio professionals. (Something that video editors need to be). Watch it and then I will give you an explanation of what actually happened.
And…. How to fix it. without re-shooting your video. YES!
Good stuff… but you are probably still scratching your head.
How it Happened
The video was shot using a wireless lavalier mic for close micing. I hope you are doing close micing. See my other post “Audio: The Ugly Stepchild of Screencasting” to find out why. After trouble-shooting the mics I discovered that one of them, the one that was used for the video at the top of the page, had an option on the receiver labeled “Audio Output Selector.” that selector allows for two settings: Balanced or unbalance (dual mono). IT WAS SET TO DUAL MONO! That was it!!!! Dual mono means that the camera was receiving TWO IDENTICAL AUDIO SIGNALS VIA ITS STEREO INPUT.
What???
TWO IDENTICAL AUDIO SIGNALS!!! Guess what….. when TWO IDENTICAL AUDIO SIGNALS are combined. They cancel each other out!! You just read that a few minutes ago.
Problem detected……now what?
The good news is it’s wicked (sorry…I spent numerous years living in Boston) easy to fix phase cancelation. The bad news is, only pro level editing apps offer the feature that you need to fix it.
To simplify: I activated a plug in in FCPX called “Gain.” This plugin has a phase reversal switch. To fix phase cancelation problems you only need to reverse either the left or right channel of the audio signal.
Watch this quick tutorial:
How to fix phase cancellation ing FCPX
How can I avoid this problem?
This problem is not likely to happen if you are only using the mic that is built-in to your camera. These mics are made to be foolproof. They are also, often times, made to be “quality audio proof” (the ugly step child rears his head again) which is why you should always use a “close micing” technique. Particularly if you are doing interviews with people.
Know your Mic
Most auxiliary or wireless mics come with many options. You need to defy all of your instincts and READ THE MANUAL. At least look at the diagrams. Know what all of the buttons do. It’s fun… you get to push buttons. Most of the time, the factory default settings work best. An Audio-Technicha ATW 1701 was used for this shooting. A great sounding mic for the money.
Make a “pre-shoot” check list.
Many of you teach video production at the high school or college level. This means that you may have many inexperienced, yet well-meaning, students shooting video. Once you find the optimal settings for your equipment, make a check list to be gone over prior to shooting. An make sure audio/mic settings are included. Video shoots are often chaotic so this step can really help you avoid problems for both video and audio (its ugly step child).
Recent Comments