Category Archives: Toolbox

Virtual Reality – Experience It Yourself

Have you ever asked yourself “how I would feel if I was the person in this situation?” Have you ever wanted the ability to switch your soul with others so you can experience someone’s life? Now, you have the technology to make your dream comes true. Virtual Reality (VR) is a “simulated experience that can be similar to or completely different from the real world” (Wikipedia). To maximize possible learning opportunities for students, VR is now more often to be applied in the classroom setting.

Virtual Reality (VR) is the use of computer technology to create a simulated environment. Unlike traditional user interfaces, VR places the user inside an experience. Instead of viewing a screen in front of them, users are immersed and able to interact with 3D worlds. By simulating as many senses as possible, such as vision, hearing, touch, even smell, the computer is transformed into a gatekeeper to this artificial world. The only limits to near-real VR experiences are the availability of content and cheap computing power.

Joe Bardi, 2019

In the picture, a female is wearing the VR glasses participating to a simulation. There is a monitor connected to the VR glasses, which shows what can be seen through the glasses. There is a hand holding object at the right bottom of the screen, which represents the actual hand movement of the participant. In other words, the participant will feel like she is actually in the situation given and experiencing like reality.
The participant is wearing the VR glasses and the monitor shows the scene shown inside the glasses.

In my point of view, VR is not directly using to collaborate with people from different areas, but it helps prepare learners and educators to engage globally soon. This article gives examples of VR uses in the classroom that benefits students’ development. Early use of VR in preschools increases students’ attention and interests to explore and learn in different ways, creating an exciting learning environment for young learners. When they get older and be able to think from different perspectives, VR helps them to virtually travel and explore the world. I believe that it is always different in emotions and inspiration when traveling through viewing photos and to “real environment” right in front of you. Google Lit Trips is a great example that allows students to read international famous literature with additional relevant information pop-up windows. This encourages students to be more open-minded with culture outside the comfort zone or the home town. They may also have more common topics to talk to when they collaborate with their global collaborative partners. It is easier to find common ground. With more opportunities trying to stand on other’s shoes, VR helps users to experience others’ “lives,” training their empathy and willingness to help the needs. 

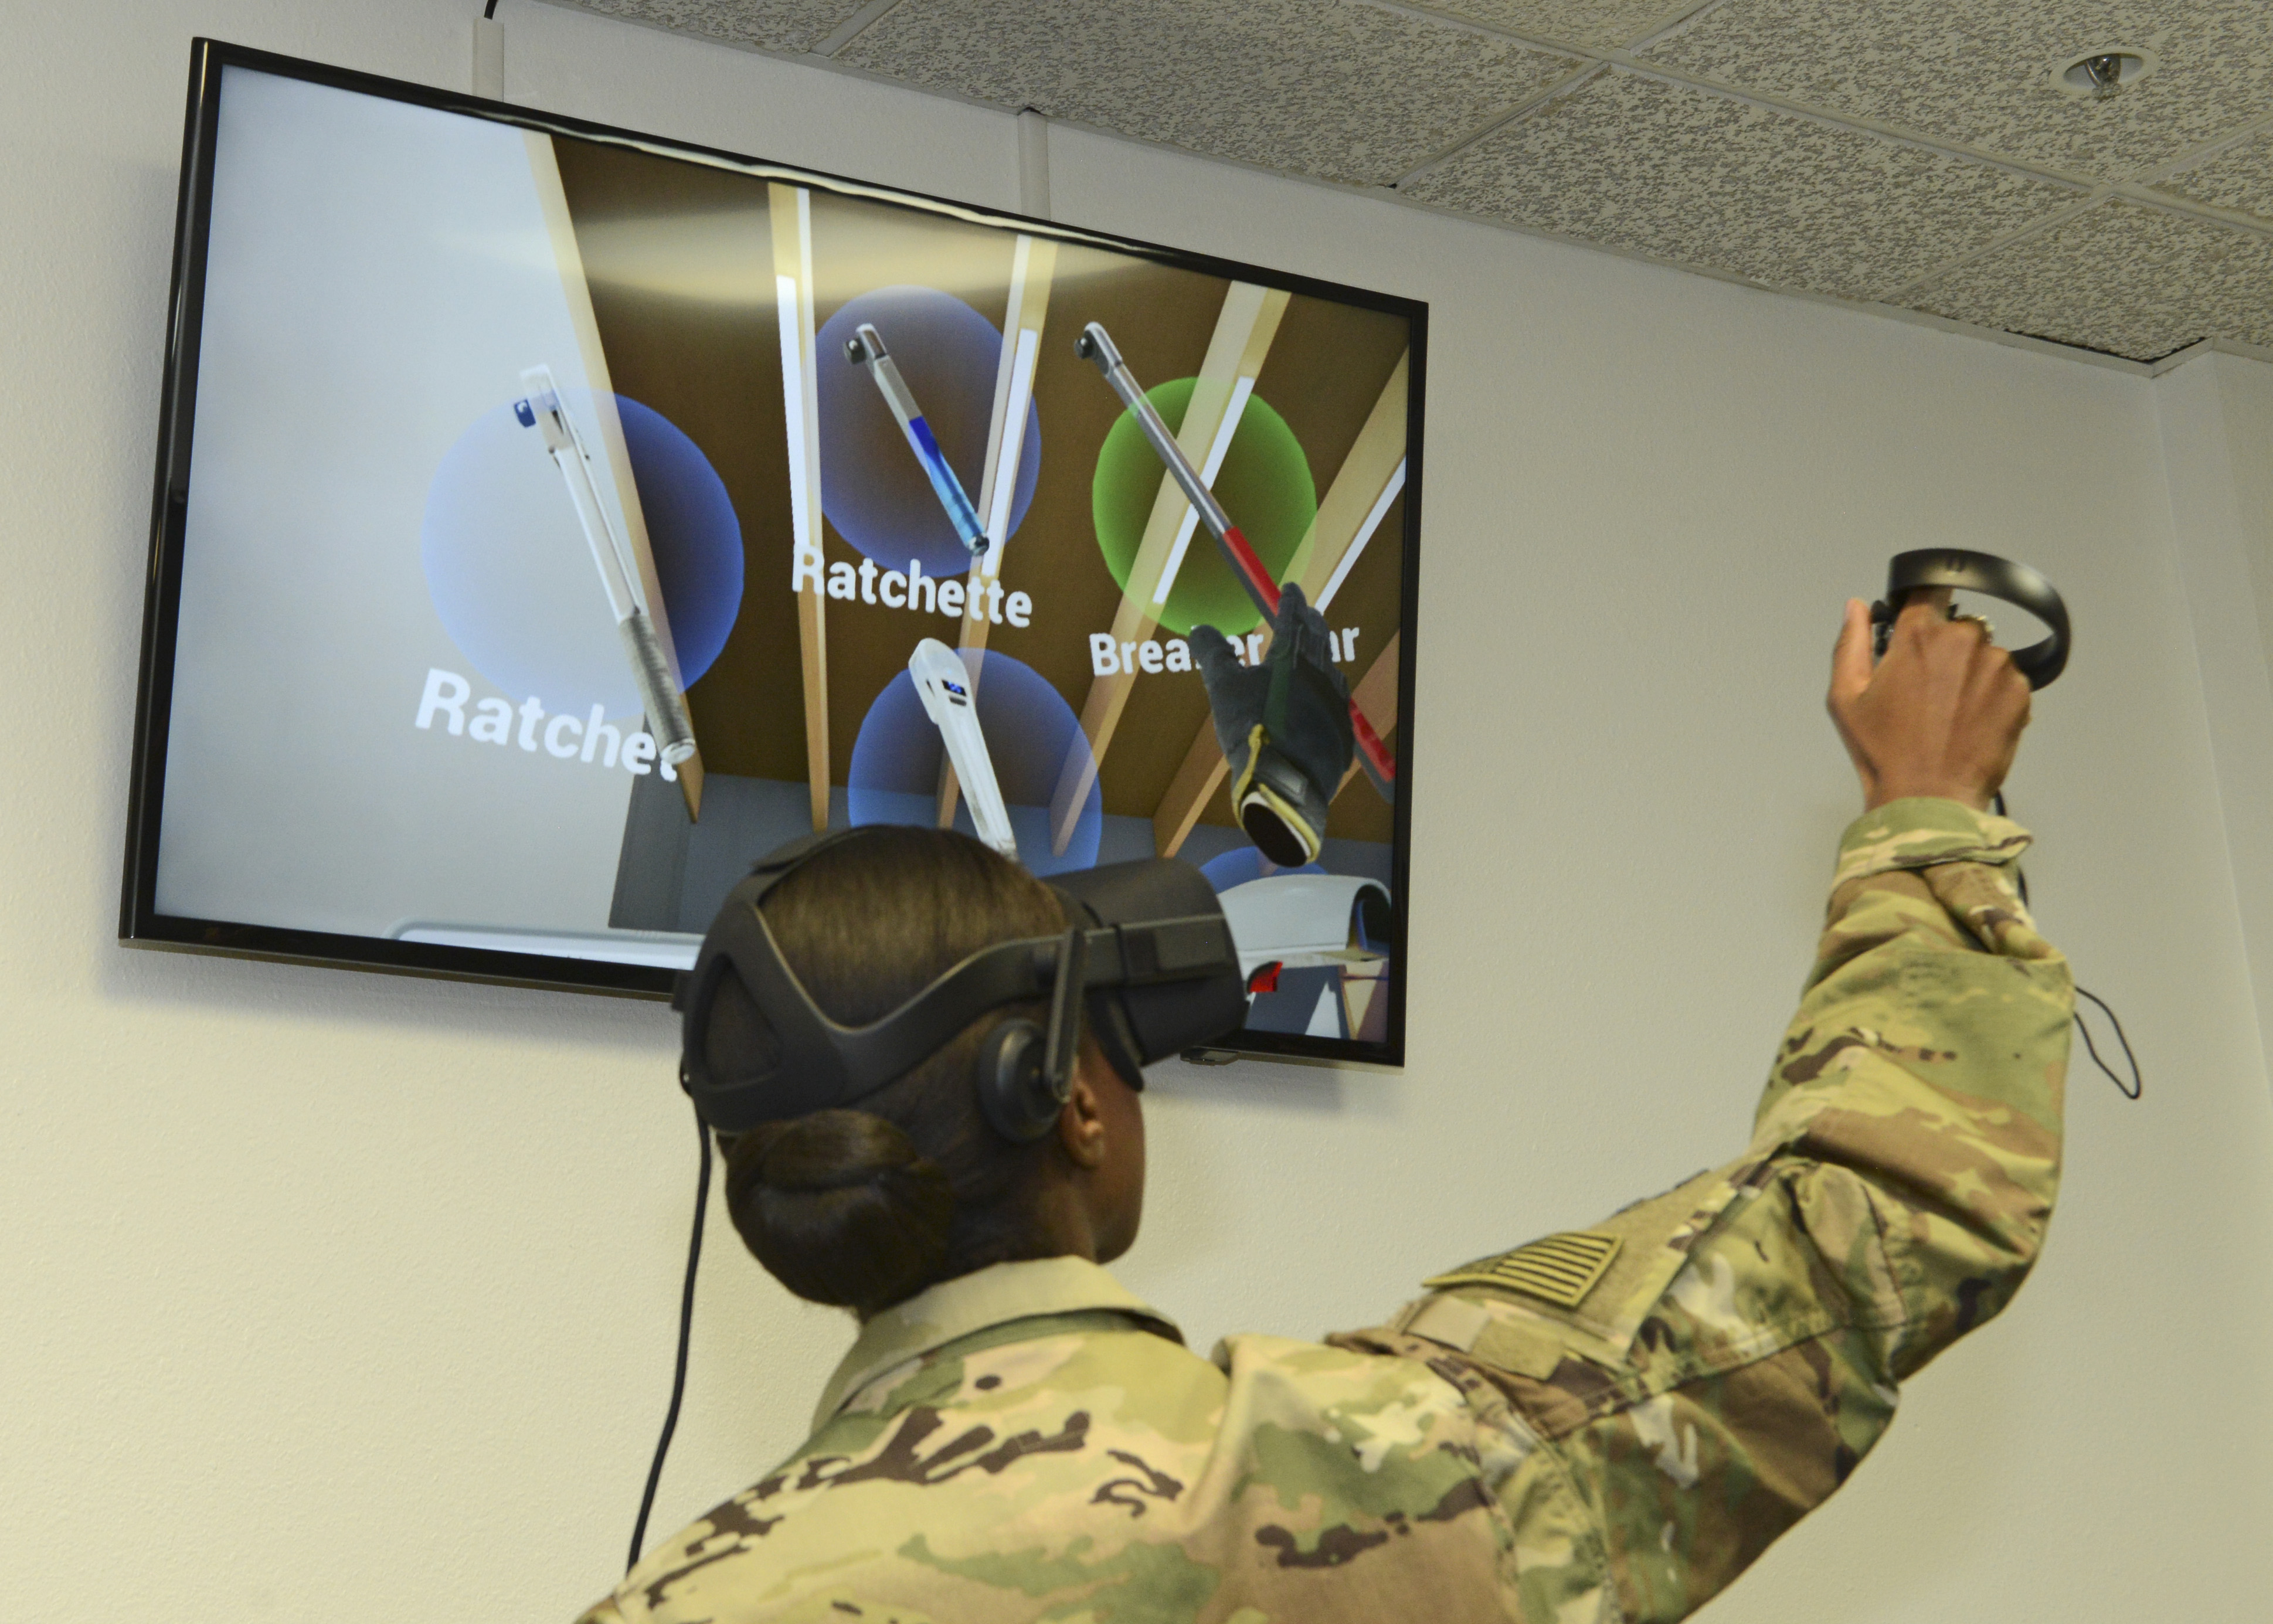
I agree with the application of VR in the classroom, especially in early education such as elementary school. In my junior year of university, I participated in psychological research. The study applied the use of VR that I played two games. The first one was about the reaction speed that someone attacked me and I had to dodge and shoot to revenge. The second one was more peaceful that all I needed to do was painting. As I was not drawing on the paper, but any spaces around me, I was able to draw in 3-dimension easily. This is difficult to explain and describe the experience that I prefer all of you to try it yourself. However, I want to bring this up in this blog post that I think it would be an extremely helpful tool to help students develop their concept about 3-dimensional drawing. My cousin has limited imagination that he cannot draw cubes or objects with distances on a paper. If VR has been widely applied to school settings earlier, he would have a chance to learn differently and even better.

A video shows how VR is applied in the classroom setting with teachers’ opinions.

Do you have any experience regarding VR?

Thank you for visiting my blog, and please do not forget to follow me on Twitter for more related information and discussions.
Twitter: @PoYeeWong4

Storytelling Web – Animoto

This week, I am going to introduce a storytelling tool, Animoto. Animoto is a video making website allowing users to create their stories using photos, videos, and music. It is easy to use that you can either upload personal pictures or insert them from online databases. To start creating a new project, Animoto provides users with different templates for various purposes, for example, birthday slideshow, event recap, and product portfolio. It is user-friendly that some guidelines and icons help you to learn to use this tool within a few minutes. You can easily add pictures and video clips by dragging to the upload area. There are numerous colors and font styles to choose from. You can also use filters to make the videos look more artistic and professional. Animoto does not only allow users to add background music but also allow them to trim song that perfectly fit with the content and story length. Once you finished making your videos, you can share it with YouTube, Facebook, LinkedIn, etc. 

A short video on how to create a video with Animoto.

I have made my Animoto video about my hobby, doing calligraphy. In my video, I introduced the use of calligraphy, the reasons I like doing calligraphy, and shared some personal experiences. A special thing about my video is that I tried to connect my hobby with happiness. I want to share this with people as a way to know more about me. Doing calligraphy implies my attitudes and goals that I want my friends and potential collaborative partners to know. I pay all my attention when doing calligraphy, which is also my attitude when working on different tasks. I always try my best and want the outcomes to be as well as it can be. Work-life balance is also one of the goals that I care about my mental state and emotions. To me, doing calligraphy is stress reliving that allows me to take a step back from what I am working on and relax. I am not forcing people around me to do calligraphy with me, but I want them to find at least one thing to help them relax.

https://animoto.com/play/4dHRHywAtHbKTqfB1xaomA
My Animoto video about doing calligraphy.

Overall, I like using Animoto and highly recommend this storytelling web to all of you. It is easy to use with a lot of features provided. It is an all-in-one tool that I can edit and trim with the same tool. It took me no more than 30 minutes to make a video. You have the choice to make the video informative, interesting, and attractive. If you are searching for a tool for your project, try Animoto!

Have you used Animoto before? What are your experiences using any storytelling tools?

Thank you for visiting my blog, and please do not forget to follow me on Twitter for more related information and discussions.
Twitter: @PoYeeWong4

Explore Something Old – Google My Maps

Curiosity is one of the significant elements of learning. Learners should be curious about not only exploring something new but also re-exploring something you have known already. In this blog post, I am sharing my experiences of using Google Maps.

A picture of Google Maps icon, which is a Google feature I have known for a long time. In this blog post, I am going to re-explore different uses of this feature.
An icon of Google Maps.

Google Maps is one of the Google features that users can search for all locations around the world. Google Maps also support 3D satellite data and street views. Users can freely upload photos, leave comments, and search for point-to-point navigation. After logging in to your Google account, you can create your Map with different location tags. It is useful when you are planning to travel, and you want to mark down all “must-visit places.”

A tutorial video on Google My Maps. The video demonstrates how to create a specific map with all the features provided.

In my Web Tools class, I use Google My Maps to create my graduation travel plan to Japan. I visited Osaka during the past summer. I found it ineffective to write all the places and restaurants I wanted to visit on a piece of paper. It was inconvenient to write all YouTube links and websites on the paper. Therefore, I told myself to look for a useful tool next time planning my trip. Luckily, I got one now!

I only stayed in Osaka for a week last time, which I think is not enough to explore everything there. Therefore, I am planning to go again after graduation. I want to go to Tokyo, Osaka, and Kyoto. In my map, I pinned my “must-visit” list, and also included two transportation routes: from Tokyo to Kyoto, and from Kyoto to Osaka. I embedded pictures of some museums to my map and used different colored pins to indicate different locations from different regions. It is also useful to change to pin icons to differentiate eating places from visiting sites.

Below is the link to my map:
https://www.google.com/maps/d/u/0/edit?mid=1oo0jjgW493QUhtiejGlIMoNw-EQLiIQ2&ll=35.16283236931343%2C137.59890229999996&z=8

Why I love using Google My Maps?

It is convenient, useful, and user-friendly. I can search for all locations around the world, pin locations, and edit anytime. Different layers allow me to organize my trip by locations, dates, or categories. Choosing to show or to hide different layers, I can easily manage my plan when traveling. It is clear in displaying. I also admire the function of sharing my map with others. People with the link, or being invited, can either view or edit my map. By saving my map in Google Drive, I can access my map with any devices, such as mobile, laptop, or tablet. Can you imagine how beneficial is it to, at the same time, check your plan, search for navigation, and visit websites at your fingertips?

Do you have any experiences using Google My Maps, and would like to share with me?

Finally, thank you for visiting my blog and please do not forget to follow me on Twitter for more related information and discussions.
Twitter: @PoYeeWong4

Buffer – A Tool Allowing You to Create Your PLN/PLC 24/7

Nowadays, people are trying so hard to develop their networks online. Although this platform diminishes the geographic limitation so that people can communicate and share with everyone all around the world, the time zone conflict is somehow cannot be solved. Imagine you are living in the U.S., and you want to collaborate with professionals in an Asian county (i.e., Japan). There are 13 hours of differences. That means when you just back to the office at 9 a.m., People in Japan just finish work, and ready for dinner. It is inconvenient that the time you are posting and sharing on social media may limit some people to get notifications immediately.


A screenshot of Buffer app webpage showing people how is the webpage look like, and what function buttons are available.
A screenshot of Buffer webpage.

Fortunately, there is an app called Buffer, which belongs to the workflow and scheduling category, helping you to schedule posts. Buffer is a good tool that you can link it with your different social media, such as Twitter, Instagram, Facebook, and LinkedIn. You can pre-type all the contents, pre-embed all links and images on Buffer, then schedule a date, day of the week, and/or specific time to post automatically. For example, you want to share a research article on Twitter in the morning time in Asia, which is your sleeping time in the U.S., you can schedule your tweet to be posted in the midnight of the U.S. time zone. Therefore, you can be active on social media anytime that you can then reply to any comments once you wake up or when you are free.

A quick guide on how to use Buffer.

A social media educator, Mattew J. Kushin, introduced Buffer to his social media collage class. With the use and comparison of two Apps (Buffer as one of the two), he wanted his students to learn the importance of scheduling, as well as the ability to analysis the best time to post to maximize the viewers. Here are his ideas for this classroom project:

“1. Students schedule content they’ve created as part of a campaign (e.g., original Tweets, Tweets sharing their blog posts, etc). using Hootsuite.

2. Students use Buffer as a compliment to Hootsuite – setting up their Buffer to post ONLY at those times that they are not posting their original content via Hoostuie. That way, when they find relevant and timely content to share, they can add it to their Buffer. If there’s no content, nothing is posted.”

Mattew Kushin (2013)

Details of Dr. Kushin’s lesson plan: USING BUFFER IN THE CLASSROOM TO TEACH STUDENTS SOCIAL MEDIA SCHEDULING.

A college student, Katherout, also shared her own experiences using Buffer for her Internship during the semester. She also mentioned the time zone problem and the characteristics of Buffer – being able to share the same/different post(s) to one or more media account(s) at the same time.

In her video, she talked about Buffer from 4:08 to 4:52.

Katherout, a college student introduced apps she found useful.

I also used Buffer before to manage my Instagram account. I had a planner account sharing my planner decoration ideas, calligraphy practices, and any other kinds of writing stuff. I wanted to regularly post as much as so I could boost my number of followers. However, I was too busy with my class schedule that I did not have break time between classes. Therefore, I scheduled posting on Buffer to help me post on Instagram while I was having classes, and even during my sleep. I found it useful that I could keep my account active even I was not online every day. As I remembered, I had about 20 followers more within two weeks, which was a great increasing ratio to me when comparing to the past.

Finally, hope you all find this post helpful, and feel free to share your ideas or toolbox with me!

Please don’t forget to follow me on Twitter for updates and more relevant information sharing.
Twitter: @PoYeeWong4